Soil Texture Testing - Two Simple Methods
Soil Texture Testing is pretty easy. Of course you can get a lab to test for you but getting up close and personal with your soil is never a bad thing.
The first method, the Jar Method, is the one you'll most commonly find on beginning garden sites. It's not too intimidating but it does require some math skills to do the job.
The second method, the Soil Texture by Feel or Ribbon Method, was one I for some reason figured was only for experts. I mean by feel - you figure you'd need to feel a lot of soil to become reasonably good at this. But turns out it's pretty straight forward and for me it's even easier and faster than the jar.
The Jar Method for Soil Texture Testing
For this method you will need a clear, straight sided jar, with a lid. A pasta sauce or mason jar will work. Remove any bigger pebbles and bits of organic matter. As well have a measuring tape or ruler handy.
 Colorado State U extention
- Collect a soil sample. Dig down a few inches so you get mostly the mineral soil. You want about a cup or so.
- Spread the soil out on some paper and remove any pebbles and as much of the bits of roots and fluffy organic matter as you can. Also crush the lumps of soil. These lumps are actually aggregates - a good thing in your soil but they need to be broken down to learn your soil texture.
- Fill the jar with soil about a quarter full.
- Add one teaspoon, about 5 ml. of Borax or Calgon if you have some. The Borax or Calgon helps the clay settle out of your soil sample.
- Shake the jar really well... like for five minutes or so. This will make sure your aggregates break down into their components.
- Set your jar in a place where it can sit undisturbed for 24 to 48 hours.
Why Borax? Why Calgon?
My first page on soil texture testing didn't include the tip on Borax or Calgon. The Calgon tip comes from Don, a reader who happens to be a retired soil lab manager. Betty tried the jar method and ran into problems because the clay layer stayed suspended.
"I even tried one of the test you mentioned where you put one cup of dirt and two cups of water in a jar and shake them up, after one minute later you get a layer of sand, one hour you get silt and 24 hours you clay and anything floating is OM. Well the first two parts worked, I got me 3/4" of each sand a silt but none of the other. The water is just this ugly brown mess and that was 4 days ago. It was still fun. Even my 6 year old granddaughter thought so." - Betty
Borax made a huge difference when I tried it so it should help with this issue. Buying a whole box of Borax or a container of Calgon to get one teaspoon full may seem excessive. But both are supposed to help get your laundry cleaner so ...
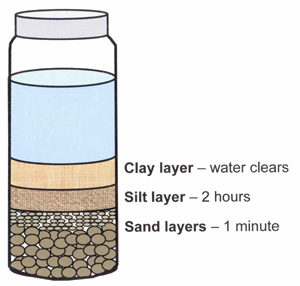
Over the next 24 - 48 hours the different components of your soil will settle into layers.
- The sand, being the biggest and heaviest particles settles first. After a minute or two you will see the sand layer at the bottom of your jar. There may end up being two sand layers, a coarse one and one that is finer.
- The silt layer settles next usually after one to two hours.
- The clay layer can take a long time to fully sink. Clay is colloidal, meaning it tends to stay in suspension. If you used borax in your jar that will tend to make the clay sink a lot faster. I tried both with and without borax to see the difference. My borax jar cleared overnight although the water itself turned a brown color. Two days later the water in the other jar is still cloudy with suspended clay.
- You
will also likely have a layer of organic matter that floats on the top
of the water. For your soil texture calculations just ignore this.
Once the water clears take your measurements. You will be able to see the layers pretty well. Where the granules are very clear it is sand, the silt has a tiny bit of texture and the clay will be very dense.
You want to get percentages of sand, silt and clay
Now it's time to do the math. Let's assume you have a total depth of soil in your jar by the time the clay settles out of 50 mm. And your measurements were 20mm sand in the bottom layer, 17 of silt in the middle and 13 of clay at the top.
From there work out your percentages 40% sand, 34% silt and 26% clay.
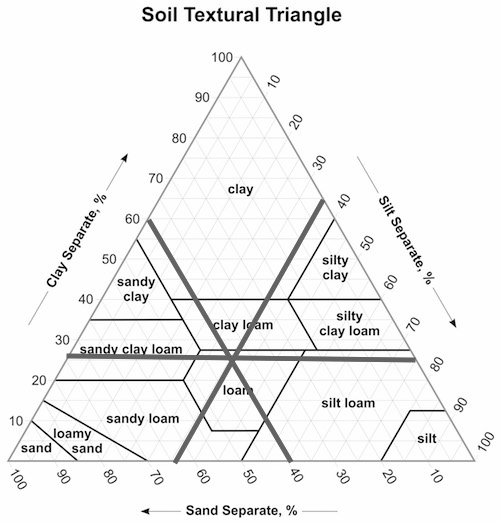
With this USDA chart, once you have your percentages, you can name your soil. You simply draw three lines for the values you got from your jar measurements and where they intersect tells you what kind of soil you have. In this case the soil would be loam. Nice.
Here is a link to a high resolution blank texture triangle chart.
The Soil Texture Testing by Feel Method
Here we are going to work with a second soil texture test often called the texture by feel test. When I first watched someone do this test I was somewhat intimidated. I figured that oodles of experience would be necessary to get the correct answer.
Happily, it turns out I was wrong. This is quick and easy… but definitely dirty. And I tested my soil with both the soil texture by jar method described in part one and this texture by feel method and got the same result.
There are three stages to the test…
Stage One - The Ball Test
First… take a handful of soil, about 25 grams or about an ounce or so. You want the mineral portion of your soil so take the sample from 3 to 4 inches (7 to 10 cm) below the soil surface.
Spread the soil onto a tray and remove any pebbles and visible bits of organic matter like roots etc.
You probably have lots of lumps and clumps of soil in your sample. Aggregates, those small lumps of soil, are made up of particles of sand, silt and clay held together by sticky substances exuded by the bacteria and fungi in the soil.
Aggregates are great, but when you are measuring soil texture you need them to break apart so you can find the differing proportions of each of the components in the soil.
 Crushing the Soil Aggregates
Some people can break these aggregates apart by simply kneading the
soil in their hands. This didn’t work for me. My soil has a lot of
aggregates and I found I needed to use a spatula to crush them in order
to do this test. Just put the soil sample on a tray and massage it with
the spatula until the lumps disappear. Then…
Take a handful of soil and wet it little by little until it is kind of like moist putty. Adjust this by adding either dry soil or water. Form the soil into a ball.
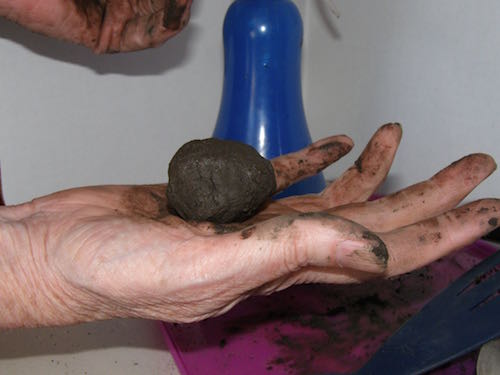 Soil Forms a Ball
Some soil will not form into a ball. You can adjust the moisture back and forth forever and it still is not a ball. This means you have Sandy soil.
For those that did get a ball, move on to Stage two.
Stage Two - The Ribbon Test
For this test take the ball of soil and gently push it into a ribbon between your thumb and forefinger. Here is a picture of me doing that.
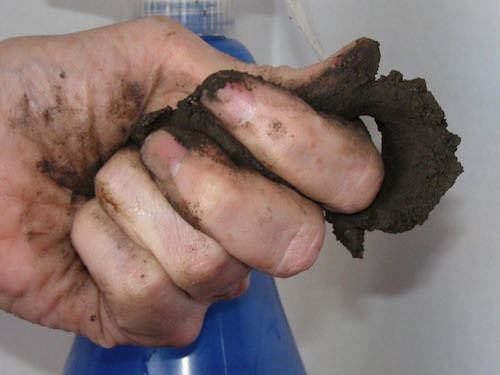 Pushing Out a Soil Ribbon with Thumb
If, as you try to form a ribbon, the soil just kind of crumbles you have Loamy Sand.
If the soil does form a ribbon you just keep pushing the soil out until the ribbon breaks from its own weight.
• Weak Ribbon - an inch or less before breaking
• Medium Ribbon - between 1 and 2 inches long before breaking
• Strong Ribbon - longer than 2 inches
The ribbon makers move on to Stage three.
Stage Three - Gritty, Smooth or Sticky
In this stage you take a small amount of the soil from your sample and put it in the palm of your hand. Add quite a bit of water and then using your finger rub the soil against your palm.
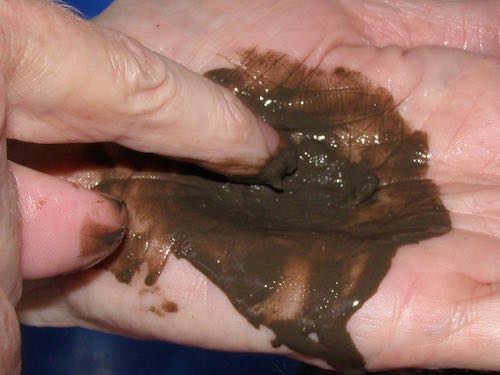 Use your Finger to Feel Soil Texture
What you are looking for is whether the soil feels
• Mostly Gritty - like there are bits of sand
• Very Smooth - like you are touching flour
• Neither gritty nor smooth predominates - might feel sticky
Here is the USDA key for this section of the soil texture testing by feel.
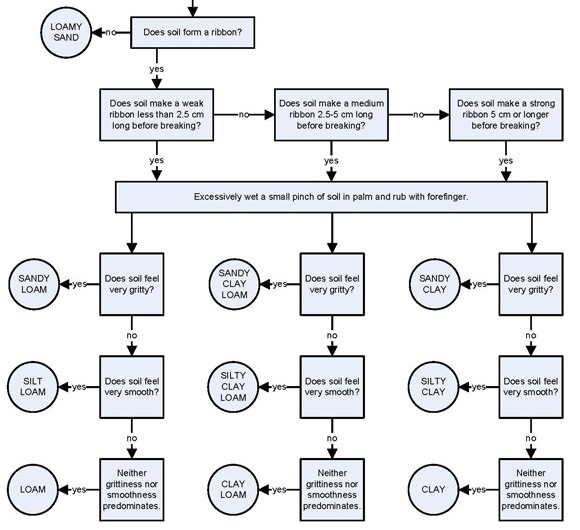 USDA Soil Texture by Feel Key
Here is a link for the complete Soil Texture Testing by Feel Key in high resolution.
Soil Texture Testing by Feel Video
You might find this video helpful to see how the whole process takes place. There is no sound on this video which is kind of weird but the visuals are excellent.
Where To Next...
Check out our Soil Texture page ... Here you can delve into just how cool the sand, silt and especially the clay portions of your soil are. As well you can learn how your soil texture affects the nutrients in your soil and how water is held in and moves through your soil. Don't roll your eyes - it's interesting...