Hot Composting Part One - Building the Compost
Hot composting is a classic style of compost making. With this style of making compost:
- weed seeds are mostly killed
- plant pathogens are eliminated or greatly reduced
- decomposition is fairly fast
However, you have to keep in mind that hot composting has certain demands
- at least a cubic yard of balanced materials to compost
- space to manage this material
- energy to build the compost and then turn it several times
Making compost that generates enough heat has two important stages. This page deals with the first stage - collecting the materials and building the compost or filling the compost bin.
Steps to Building a Hot Compost
First… Build a Big Compost Bin … or Two
It's perfectly acceptable - in some neighbourhoods and some families - to compost in a naked pile, but many people like to keep things tidy using bins.
The weird thing is … there are very few commercially available compost bins large enough for a hot compost. Each bin needs to be able to hold a cubic yard or 27 cubic feet of material. Most affordable bins run about 12 cubic feet - less than half the size needed for this process.
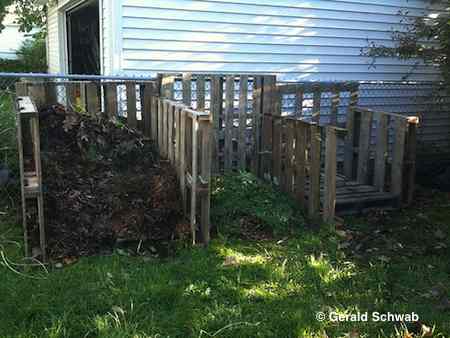
And… for hot composting you need two bins able to hold at least a cubic yard, one holding the material, the other empty and ready to turn the compost into. Many people use a three bin system with the third bin for either curing the compost or stockpiling materials for building the next pile. Here is an example of a very quick pallet bin system. Usually you can get pallets for free and you can literally tie them together with rope or use any fastener you concoct that will work.
These are some other factors to consider when choosing where to make your compost pile or locate those large bins you plan to use. Make your compost:
- near water so you can add water if necessary
- near where the materials you want to compost are
- or on top of the area where you plan to use the compost
- a level area
- double the size of the pile so you can flip it
- not touching your house or fence (you don't want to turn your fence or house into compost)
Then Pick Your Compost Recipe - Fungi or Bacteria
In May I attended Doug Weatherbee's 4 day workshop on soil and compost. By the way it was great and I recommend it to any of you wanting to delve deeply into soil microbiology. At the workshop Doug gave us two recipes for thermophilic or hot compost, one favoring bacteria and the other boosting fungi.
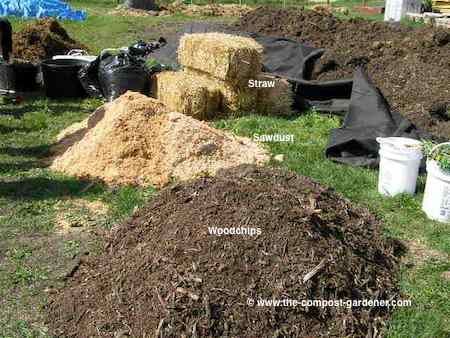
Making up a compost recipe is essentially about balancing the ratio of carbon to nitrogen, or the C/N ratio. Our compost ingredients page gives lots of information on this and how you can classify different materials you have on hand to make a good compost. Doug uses three classes of materials in his recipes:
- High nitrogen - what I call hot greens and includes many manures as well as seed meals.
- Greens - what I call moist greens and which includes food scraps, coffee grounds, grass clippings.
- Woody - what I call high and very high carbon and includes fall leaves, wood chips, and shredded paper and cardboard.
Bacteria Compost Recipe
|
Fungi Compost Recipe
|
The bacteria recipe is perfect for lawns and some vegetables such as the cabbage family. It will heat up quickly.
The fungi recipe is good for most vegetables, perennials, shrubs and trees. It will take longer to heat up.
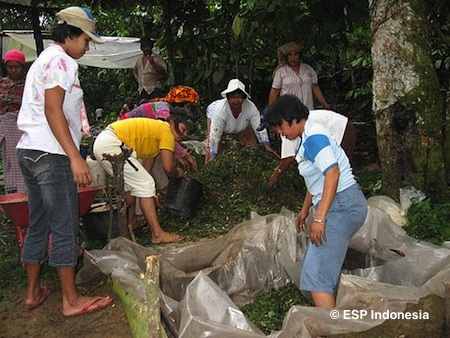
Now... Collect Your Ingredients... All of Them
Hot composting is a batch process. You need to have all the materials ready to go the day you build your compost pile or fill that big bin. You will not add kitchen wastes as they come available for example. The only exception is when you have a problem that is best solved by adjusting the mix - this will be covered in the part 2 management page.
Using your compost recipe as a guide collect all the materials you need to build a compost of at least one cubic yard (roughly 1 cubic meter). For example, lets say you are going to measure your ingredients by 5 gallon (roughly 20 litre) pail and you've decided to build a bacteria dominant pile for your lawn and brassica beds. For one cubic yard you'll need a total of 35 full buckets of material and will want
- 7 buckets of high nitrogen greens (35 x 20%)
- 16 buckets of regular greens (35 x 45%)
- 12-13 buckets of browns (35 x 35%)
When you are measuring your materials use volume rather than weight.
You'll drive yourself crazy with weights because you'll also need to
consider exact moisture content of everything and trust me volume works
well enough for home composters.
If you have more materials just carry on in the same proportions.
Having
a mix of ingredients is good. Each different material will have its own
set of microbes attached and will bring your compost better
biodiversity. Biodiversity in the final product is what you're after so
bring variety to the pile when possible.
Warning - Be careful with ingredients that might have persistent herbicide residues on them - especially horse manure.
Next... Prepare Your Compost Ingredients
Chop - Smaller chunks of material break down faster than larger ones. It's about surface area. You should aim for getting your materials to a 1-2 inch size. Shred your leaves with a shredder or your lawn mower if possible. This helps prevent them from matting and forming a barrier to air and water inside your pile.
Moisten - Some of your materials will likely be dry. It's very important to ensure your materials have an overall moisture level of about 50%. High carbon ingredients may need to be wetted before building your compost.
Some people might use a moisture meter to measure this but your hand will work well. Pick up the material and squeeze it tightly. If no water comes out at all the material is too dry and you need to add water. If a steady stream of water comes out it is too wet and you should spread it out and let it dry before using it. If only a drop or two is squeezed out you have the ideal moisture level.
Some materials when dry tend to need time to absorb water and get truly moist. Straw for example needs to soak the water in for 24 hours or so before it is damp enough.
Finally... Build The Pile or Fill the Bin
Once you have all your materials ready it's time to mix them together. If you have a large enough bin system you can fill the bin. If not a pile is fine. A pile tends to be bigger at the bottom than the top so start off with about a 4 x 4 foot area at the bottom and build from there.
Don't build your pile or fill your bin higher than 5 feet tall. Higher than 5 feet and the weight of the material tends to squeeze the air out of the pile. You want to keep air circulating.
There are countless diagrams showing a nice neat series of layers of greens and browns in building the compost. This is a good way to measure your ingredients. For example for the fungal compost recipe you might fill half the bin with woody and high carbon stuff, a third with greens and the balance with hot greens.
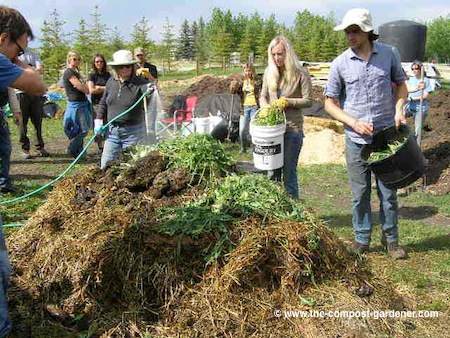
As you add material spray it all down with water.
Some people like to add extra biology to the compost at this time. At the workshop I went to with Doug Weatherbee we drenched the compost pile we built with several gallons of compost extract that had been made from worm castings. This is optional but not a bad idea.
Last... Turn and Protect
This is the start of hot composting management but it is important to do right at this point. Those layers are great in diagrams and nice to use when measuring your compost ingredients, but in the life of the compost pile they are not the least bit helpful.

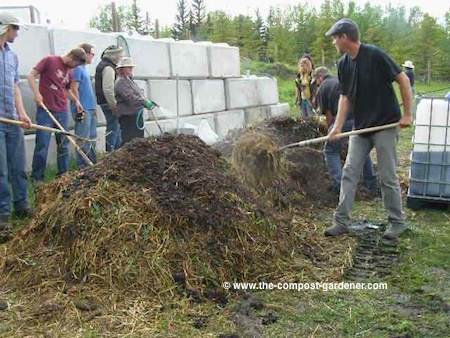
So… as soon as you have all your compost ingredients in your bin or pile you should do the first turning. The idea here is to mix the materials up as thoroughly as possible. If materials are somewhat dry take this opportunity to once again spray down all the ingredients with water as you turn.
The mixed compost may need some protection depending on where you live to help keep the right moisture level.